How to: Use PowerShell with SharePoint Online Preview
Posted
Thursday, November 29, 2012 7:59 AM
by
CoreyRoth
I recently spoke about PowerShell at SharePoint Conference 2012 (SPC195). It turns out PowerShell support slipped into SharePoint Online Preview without a lot of people noticing. In my session at SPC12, I walked users through a lot of common scenarios of using PowerShell with SPO that I wanted to share with you. This post will show you how to get connected to your SharePoint Online tenant and how to do work with sites. In a follow-up post, I’ll show you how to work with users and groups. Keep in mind this only work with SharePoint Online Preview right now. When your existing V14 tenants get upgraded to V15, you will be able to use it then.
To get started, you need to install the SharePoint Online Management Shell. Since this is based on PowerShell 3.0, you need to have that installed. If you have Windows 8 or you are running this on a machine with SharePoint 2013 already, you’re ready to go. However, if you are running Windows 7, you’ll need to install Windows Management Framework 3.0. After you have installed it, simply launch SharePoint Online Management Shell from the start menu. You shouldn’t need to run it as Administrator.
Connecting to SharePoint Online
Before you connect to SharePoint Online, you’ll need to have the username and password for an account with global administrator permissions. You’ll also need to know your tenant admin URL (i.e.: https://mytenant-admin.sharepoint.com). When connecting to SharePoint Online, don’t forget to reference all URLs securely using https. If you try and use http, you will get an error.
To connect to SharePoint Online, use the Connect-SPOService command. It takes the URL to your tenant admin and a username. When you connect, you’ll be prompted for your password.
Connect-SPOService –Url https://mytenant-admin.sharepoint.com –Credential admin@mytenant.onmicrosoft.com
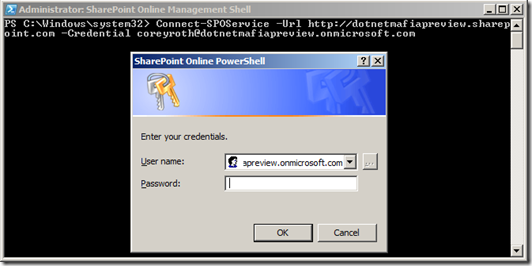
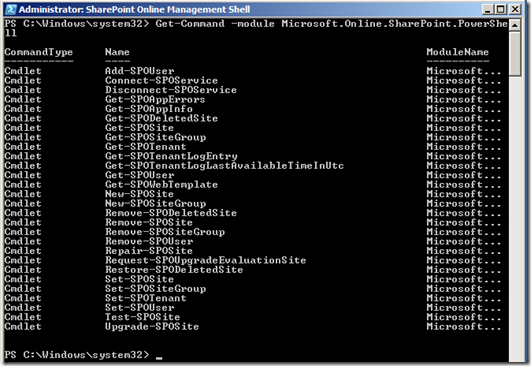
If you connect successfully, you will be returned to the command prompt without error. To see what commands are available, we can use Get-Command and pass it the module Microsoft.Online.SharePoint.PowerShell.dll. You can get the full list on TechNet.
Get-Command –Module Microsoft.Online.SharePoint.PowerShell
Getting Site Collections
To work with Site Collections, use Get-SPOSite (TechNet). It can return a single site with the –Identity parameter or it can filter a list of them with the –Filter parameter. The Filter parameter does server side filtering and can be used with the case sensitive operators (-like, –notlike, –eq, and –ne). You can also run it without any parameters to return all site collections.
Get-SPOSite
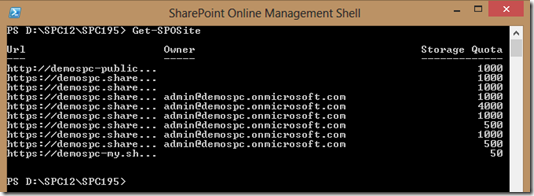
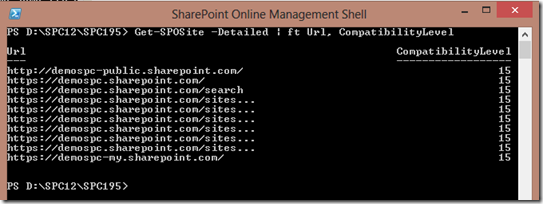
This doesn’t return the data in the greatest format though. It would be nice to see the full URL and when thinking about upgrades it would nice to see the CompatibilityLevel (either 14 or 15). We can do this by piping the output to Format-Table (ft) and specifying the desired fields.
Get-SPOSite | ft Url, CompatibilityLevel
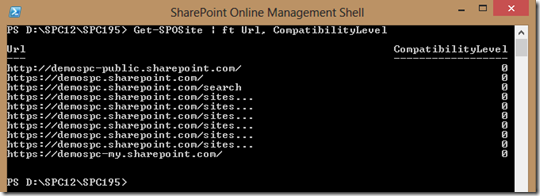
You’ll notice that the CompatibilityLevel came back as 0 here. This is because, Get-SPOSite uses CSOM under the hood and it does not request all values by default. To get this data, you need to add the –Detailed parameter.
Get-SPOSite –Detailed | ft Url, CompatibilityLevel
The syntax of the server side filtering can be a bit tricky. The key thing to remember is that the operators are case sensitive so they must be lower-case. In the example, below I do a server-side filter looking for any site with the word “Contoso” in the URL. Put the expression you are searching for in braces.
Get-SPOSite –Filter {Url -like “*term*} | Ft Url

One thing you may have noticed is that there are not any commands to create subsites. Currently only site collections are supported.
Creating Site Collections
Site Collections can be created using the New-SPOSite (TechNet) cmdlet. This cmdlet takes a heap of parameters. Note that you still have to use the preset managed paths available to you in SharePoint Online.
- -Url – full URL of the site collection (don’t forget to use https)
- -Owner – full user name of site owner (i.e.: admin@mytenant.onmicrosoft.com)
- -StorageQuota – in MB
- -ResourceQuota – number of resources to allocate
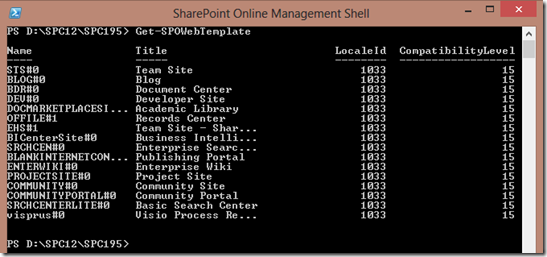
- -Template (Optional) – i.e.: STS#0 – Use Get-SPOWebTemplate to view a list of available templates
- -Title (Optional) – name of site collection
- -NoWait – instructs PowerShell not to wait until the cmdlet is finished
New-SPOSite -Url https://mytenant.sharepoint.com/sites/sitename -Owner "admin@mytenant.onmicrosoft.com" -StorageQuota "500" -NoWait -ResourceQuota "500" -Template "STS#0" -Title "Site Title"

As mentioned above, you can run Get-SPOWebTemplate to return a list of available site templates.
Get-SPOWebTemplate
Deleting Site Collections
To delete a site collection simply, use Remove-SPOSite (TechNet) and pass it the URL in the Identity parameter. It can also optionally take the –NoWait parameter was well.
Remove-SPOSite –Identity https://mytenant.sharepoint.com/sites/sitename –NoWait

Restoring Site Collections
Deleted site collections get moved to the site collection recycle bin. To restore a site collection that you have deleted, use Restore-SPODeletedSite (TechNet). It takes the same parameters as Remove-SPOSite.
Restore-SPODeletedSite –Identity https://mytenant.sharepoint.com/sites/sitename –NoWait

Upgrading Site Collections
SharePoint Online also has the concept of deferred site collection upgrades. This means you can upgrade the site collections one-by-one or in batch using PowerShell. To run the Site Collection health check first, use Test-SPOSite (TechNet) and pass it the URL in the identity parameter. Once you are ready to upgrade use Upgrade-SPOSite (TechNet). Be sure and pass the –V2VUpgrade parameter or it won’t upgrade it.
Test-SPOSite -Identity http://mytenant.sharepoint.com/sites/sitename
Upgrade-SPOSite -Identity http://mytenant.sharepoint.com/sites/sitename -V2VUpgrade
Unfortunately, I don’t have a tenant that can be upgraded yet, so I can’t provide a screenshot of this procedure.
Hopefully, you found these PowerShell cmdlets useful. I think they will help a lot when it comes to working with SharePoint Online. In the next post, we’ll cover how to work with users and groups.