When it comes to deploying SharePoint artifacts, I pretty much always insist on doing as much as possible using a feature and CAML as opposed to using the UI or writing code. CAML is very possible and most people don’t realize how much you can do with it. The XML scares a lot of people but there are a lot of techniques you can use now in SharePoint 2010 to avoid writing a lot of this manually. This article assumes you have some familiarity in deploying content types and site columns using a feature. If you need more information on this, feel free to ask and I’ll post more on it.
As you probably know a Document Set is simply a content type which contains other content types. For today’s example, I’m going to deploy a Document Set called Work Order. It will contain two child content types: Contract and Invoice. Let’s look at these child content types real quick. Both inherit from Document and I only specifically list my custom site columns in it.
Here is what Contract looks like:
<?xml version="1.0" encoding="utf-8"?>
<Elements xmlns="http://schemas.microsoft.com/sharepoint/">
<ContentType ID="0x0101000F9EF6A4CF6E7046A227BC48222671DC" Name="Contract" Group="Custom Content Types" Overwrite="TRUE" xmlns="http://schemas.microsoft.com/sharepoint/">
<Folder TargetName="_cts/Contract" />
<FieldRefs>
<FieldRef ID="
{6d392ce3-12e0-49f7-ba79-04f2b2e67269}"
Name="
Contract_x0020_Number"
/> <FieldRef ID="{f7b6fc7c-eb22-43dd-89a5-799874d7a5d7}" Name="Effective_x0020_Date" />
</FieldRefs>
<XmlDocuments>
<XmlDocument NamespaceURI="http://schemas.microsoft.com/sharepoint/v3/contenttype/forms">
<FormTemplates xmlns="http://schemas.microsoft.com/sharepoint/v3/contenttype/forms">
<Display>DocumentLibraryForm</Display>
<Edit>DocumentLibraryForm</Edit>
<New>DocumentLibraryForm</New>
</FormTemplates>
</XmlDocument>
</XmlDocuments>
</ContentType>
</Elements>
My Invoice content type looks quite similar. Note that the Contract Number field is shared between the two content types.
<?xml version="1.0" encoding="utf-8"?>
<Elements xmlns="http://schemas.microsoft.com/sharepoint/">
<ContentType ID="0x0101006754EF61193E3942B6851FBE641DD21E" Name="Invoice" Group="Custom Content Types" Overwrite="TRUE" xmlns="http://schemas.microsoft.com/sharepoint/">
<Folder TargetName="_cts/Invoice" />
<FieldRefs>
<FieldRef ID="{6d392ce3-12e0-49f7-ba79-04f2b2e67269}" Name="Contract_x0020_Number" />
<FieldRef ID="{1dfcbcef-d1e1-42a1-bd59-a2079cc7ca36}" Name="Amount" />
</FieldRefs>
<XmlDocuments>
<XmlDocument NamespaceURI="http://schemas.microsoft.com/sharepoint/v3/contenttype/forms">
<FormTemplates xmlns="http://schemas.microsoft.com/sharepoint/v3/contenttype/forms">
<Display>DocumentLibraryForm</Display>
<Edit>DocumentLibraryForm</Edit>
<New>DocumentLibraryForm</New>
</FormTemplates>
</XmlDocument>
</XmlDocuments>
</ContentType>
</Elements>
Now how do we deploy the Document Set? It’s actually not that complicated. We define it just like a regular content type that inherits from Content Type Id 0x0120D520. Here is what the first line looks like in the elements.xml for my Document Set. As you can see, I started with that Content Type Id and appended 00, plus my own GUID (minus dashes and brackets).
<ContentType ID="0x0120D5200032EBDCE82398324CAD4E4E21C3233AA7" Name="Work Order" Group="Custom Content Types" Overwrite="TRUE" ProgId="SharePoint.DocumentSet" PushDownChangedResourceFilesOnly="TRUE" xmlns="http://schemas.microsoft.com/sharepoint/">
In the next section, I reference my custom site columns, Contract Number. I included all of the other FieldRef elements that are inherited but I expect you can leave them out.
<FieldRefs>
<FieldRef ID="{c042a256-787d-4a6f-8a8a-cf6ab767f12d}" Name="ContentType" />
<FieldRef ID="{b824e17e-a1b3-426e-aecf-f0184d900485}" Name="ItemChildCount" />
<FieldRef ID="{960ff01f-2b6d-4f1b-9c3f-e19ad8927341}" Name="FolderChildCount" />
<FieldRef ID="{fa564e0f-0c70-4ab9-b863-0177e6ddd247}" Name="Title" Required="FALSE" Hidden="TRUE" />
<FieldRef ID="{8553196d-ec8d-4564-9861-3dbe931050c8}" Name="FileLeafRef" Required="TRUE" Hidden="FALSE" />
<FieldRef ID="{cbb92da4-fd46-4c7d-af6c-3128c2a5576e}" Name="Description" ShowInNewForm="TRUE" ShowInEditForm="TRUE" />
<FieldRef ID="{6d392ce3-12e0-49f7-ba79-04f2b2e67269}" Name="Contract_x0020_Number" />
</FieldRefs>
The rest of the magic behind Document Sets exists in the XmlDocuments section of the content type. I won’t describe all of them but I will include the ones that are of interest. The most important section describes which content types are in the Document Set. You need to include one AllowedContentType element for each content type included. In this case, I have the Content Type Ids for Document, Contract, and Invoice.
<XmlDocument NamespaceURI="http://schemas.microsoft.com/office/documentsets/allowedcontenttypes">
<act:AllowedContentTypes xmlns:act="http://schemas.microsoft.com/office/documentsets/allowedcontenttypes" LastModified="11/29/2010 18:57:35">
<AllowedContentType id="0x0101" />
<AllowedContentType id="0x0101000F9EF6A4CF6E7046A227BC48222671DC" />
<AllowedContentType id="0x0101006754EF61193E3942B6851FBE641DD21E" />
</act:AllowedContentTypes>
</XmlDocument>
The SharedField element specifies which fields are shared between content types. The value of this site column set at the Document Set level will be written into the child content types automatically.
<XmlDocument NamespaceURI="http://schemas.microsoft.com/office/documentsets/sharedfields">
<sf:SharedFields xmlns:sf="http://schemas.microsoft.com/office/documentsets/sharedfields" LastModified="11/29/2010 18:58:08">
<SharedField id="6d392ce3-12e0-49f7-ba79-04f2b2e67269" />
</sf:SharedFields>
</XmlDocument>
The WelcomePageField element controls which site columns show up on the welcome page of the content type. In this case I want the Contract Number displayed so I include that site column’s Id.
<XmlDocument NamespaceURI="http://schemas.microsoft.com/office/documentsets/welcomepagefields">
<wpf:WelcomePageFields xmlns:wpf="http://schemas.microsoft.com/office/documentsets/welcomepagefields" LastModified="11/29/2010 18:58:08">
<WelcomePageField id="6d392ce3-12e0-49f7-ba79-04f2b2e67269" />
</wpf:WelcomePageFields>
</XmlDocument>
Document Sets also give you the ability to create default documents for each content type in the set. The DefaultDocument element is how you do this by specifying a filename and a Content Type Id. I’ll talk about how you actually get the files deployed in the right place here in a little bit.
<XmlDocument NamespaceURI="http://schemas.microsoft.com/office/documentsets/defaultdocuments">
<dd:DefaultDocuments xmlns:dd="http://schemas.microsoft.com/office/documentsets/defaultdocuments" LastModified="11/29/2010 17:06:58" AddSetName="True">
<DefaultDocument name="Contract Template.docx" idContentType="0x0101000F9EF6A4CF6E7046A227BC48222671DC" />
<DefaultDocument name="Invoice Template.xlsx" idContentType="0x0101006754EF61193E3942B6851FBE641DD21E" />
</dd:DefaultDocuments>
</XmlDocument>
Here is what the whole elements.xml file looks like for my document set. I omitted details on a few of the XmlDocument elements but they seem to always have the same values.
<?xml version="1.0" encoding="utf-8"?>
<Elements xmlns="http://schemas.microsoft.com/sharepoint/">
<ContentType ID="0x0120D5200032EBDCE82398324CAD4E4E21C3233AA7" Name="Work Order" Group="Custom Content Types" Overwrite="TRUE" ProgId="SharePoint.DocumentSet" PushDownChangedResourceFilesOnly="TRUE" xmlns="http://schemas.microsoft.com/sharepoint/">
<Folder TargetName="_cts/Work Order" />
<FieldRefs>
<FieldRef ID="{c042a256-787d-4a6f-8a8a-cf6ab767f12d}" Name="ContentType" />
<FieldRef ID="{b824e17e-a1b3-426e-aecf-f0184d900485}" Name="ItemChildCount" />
<FieldRef ID="{960ff01f-2b6d-4f1b-9c3f-e19ad8927341}" Name="FolderChildCount" />
<FieldRef ID="{fa564e0f-0c70-4ab9-b863-0177e6ddd247}" Name="Title" Required="FALSE" Hidden="TRUE" />
<FieldRef ID="{8553196d-ec8d-4564-9861-3dbe931050c8}" Name="FileLeafRef" Required="TRUE" Hidden="FALSE" />
<FieldRef ID="{cbb92da4-fd46-4c7d-af6c-3128c2a5576e}" Name="Description" ShowInNewForm="TRUE" ShowInEditForm="TRUE" />
<FieldRef ID="{6d392ce3-12e0-49f7-ba79-04f2b2e67269}" Name="Contract_x0020_Number" />
</FieldRefs>
<XmlDocuments>
<XmlDocument NamespaceURI="http://schemas.microsoft.com/office/documentsets/defaultdocuments">
<dd:DefaultDocuments xmlns:dd="http://schemas.microsoft.com/office/documentsets/defaultdocuments" LastModified="11/29/2010 17:06:58" AddSetName="True">
<DefaultDocument name="Contract Template.docx" idContentType="0x0101000F9EF6A4CF6E7046A227BC48222671DC" />
<DefaultDocument name="Invoice Template.xlsx" idContentType="0x0101006754EF61193E3942B6851FBE641DD21E" />
</dd:DefaultDocuments>
</XmlDocument>
<XmlDocument NamespaceURI="http://schemas.microsoft.com/office/documentsets/welcomepageview">
<WelcomePageView xmlns="http://schemas.microsoft.com/office/documentsets/welcomepageview" LastModified="1/1/1 0:00:01 AM" />
</XmlDocument>
<XmlDocument NamespaceURI="http://schemas.microsoft.com/office/documentsets/allowedcontenttypes">
<act:AllowedContentTypes xmlns:act="http://schemas.microsoft.com/office/documentsets/allowedcontenttypes" LastModified="11/29/2010 18:57:35">
<AllowedContentType id="0x0101" />
<AllowedContentType id="0x0101000F9EF6A4CF6E7046A227BC48222671DC" />
<AllowedContentType id="0x0101006754EF61193E3942B6851FBE641DD21E" />
</act:AllowedContentTypes>
</XmlDocument>
<XmlDocument NamespaceURI="http://schemas.microsoft.com/office/documentsets/sharedfields">
<sf:SharedFields xmlns:sf="http://schemas.microsoft.com/office/documentsets/sharedfields" LastModified="11/29/2010 18:58:08">
<SharedField id="6d392ce3-12e0-49f7-ba79-04f2b2e67269" />
</sf:SharedFields>
</XmlDocument>
<XmlDocument NamespaceURI="http://schemas.microsoft.com/office/documentsets/welcomepagefields">
<wpf:WelcomePageFields xmlns:wpf="http://schemas.microsoft.com/office/documentsets/welcomepagefields" LastModified="11/29/2010 18:58:08">
<WelcomePageField id="6d392ce3-12e0-49f7-ba79-04f2b2e67269" />
</wpf:WelcomePageFields>
</XmlDocument>
<XmlDocument NamespaceURI="http://schemas.microsoft.com/sharepoint/v3/contenttype/forms">
<FormTemplates xmlns="http://schemas.microsoft.com/sharepoint/v3/contenttype/forms">
<Display>ListForm</Display>
<Edit>ListForm</Edit>
<New>DocSetDisplayForm</New>
</FormTemplates>
</XmlDocument>
<XmlDocument NamespaceURI="http://schemas.microsoft.com/sharepoint/v3/contenttype/forms/url">
<FormUrls xmlns="http://schemas.microsoft.com/sharepoint/v3/contenttype/forms/url">
<New>_layouts/NewDocSet.aspx</New>
</FormUrls>
</XmlDocument>
</XmlDocuments>
</ContentType>
</Elements>
Note the path specified in the folder element as this is important. I mentioned that there were extra steps involved in deploying the default documents. For this we need a module element. We also need this module element to deploy the actual page that is displayed when you view the document set. Start by creating a new module in Visual Studio 2010. In the module, create a folder called _cts. Then create a subfolder under that which is unique to your content type. In this case, I named it Work Order to match the name of my content type. Now we need to get a copy of the page that displays when you view the document set. By default, this file is called docsethomepage.aspx. You can find it in 14\FEATURES\DocumentSet. You can also get it by exporting a site template that has a document set. You import the .wsp file in Visual Studio and then look for the corresponding cts module entry. The last step is a bit more involved, but it is how I determined which web parts to include in the module element. Drag this page into your module folder along with the default documents you want for your content type (i.e.: Contact Template.docx and Invoice Template.xlsx).
Here is what my completed module elements.xml looks like.
<?xml version="1.0" encoding="utf-8"?>
<Elements xmlns="http://schemas.microsoft.com/sharepoint/">
<Module Name="WorkOrderCts">
<File Path="WorkOrderCts\_cts\Work Order\docsethomepage.aspx" Url="_cts/Work Order/docsethomepage.aspx">
<AllUsersWebPart WebPartOrder="0" WebPartZoneID="WebPartZone_TopLeft" ID="g_737f2b01_0a4b_4cd9_9c5e_658e2ad65920">
<![CDATA[<WebPart xmlns:xsi="http://www.w3.org/2001/XMLSchema-instance" xmlns:xsd="http://www.w3.org/2001/XMLSchema" xmlns="http://schemas.microsoft.com/WebPart/v2">
<Title>Image</Title>
<FrameType>Default</FrameType>
<Description>Use to display pictures and photos.</Description>
<IsIncluded>true</IsIncluded>
<ZoneID>WebPartZone_TopLeft</ZoneID>
<PartOrder>0</PartOrder>
<FrameState>Normal</FrameState>
<AllowRemove>true</AllowRemove>
<AllowZoneChange>true</AllowZoneChange>
<AllowMinimize>true</AllowMinimize>
<AllowConnect>true</AllowConnect>
<AllowEdit>true</AllowEdit>
<AllowHide>true</AllowHide>
<IsVisible>true</IsVisible>
<HelpMode>Modeless</HelpMode>
<Dir>Default</Dir>
<MissingAssembly>Cannot import this Web Part.</MissingAssembly>
<Assembly>Microsoft.SharePoint, Version=14.0.0.0, Culture=neutral, PublicKeyToken=71e9bce111e9429c</Assembly>
<TypeName>Microsoft.SharePoint.WebPartPages.ImageWebPart</TypeName>
<ImageLink xmlns="http://schemas.microsoft.com/WebPart/v2/Image">/_layouts/images/docset_welcomepage_big.png</ImageLink>
</WebPart>]]>
</AllUsersWebPart>
<AllUsersWebPart WebPartOrder="0" WebPartZoneID="WebPartZone_CenterMain" ID="g_8882074f_409f_4ce4_8fb9_7e4ce9aa1d93">
<![CDATA[<WebPart xmlns:xsi="http://www.w3.org/2001/XMLSchema-instance" xmlns:xsd="http://www.w3.org/2001/XMLSchema" xmlns="http://schemas.microsoft.com/WebPart/v2">
<Title>Document Set Contents</Title>
<FrameType>Default</FrameType>
<Description>Displays the contents of the Document Set.</Description>
<IsIncluded>true</IsIncluded>
<ZoneID>WebPartZone_CenterMain</ZoneID>
<PartOrder>0</PartOrder>
<FrameState>Normal</FrameState>
<AllowRemove>true</AllowRemove>
<AllowZoneChange>true</AllowZoneChange>
<AllowMinimize>true</AllowMinimize>
<AllowConnect>true</AllowConnect>
<AllowEdit>true</AllowEdit>
<AllowHide>true</AllowHide>
<IsVisible>true</IsVisible>
<HelpMode>Modeless</HelpMode>
<Dir>Default</Dir>
<MissingAssembly>Cannot import this Web Part.</MissingAssembly>
<PartImageLarge>/_layouts/images/msimagel.gif</PartImageLarge>
<Assembly>Microsoft.Office.DocumentManagement, Version=14.0.0.0, Culture=neutral, PublicKeyToken=71e9bce111e9429c</Assembly>
<TypeName>Microsoft.Office.Server.WebControls.DocumentSetContentsWebPart</TypeName>
</WebPart>]]>
</AllUsersWebPart>
<AllUsersWebPart WebPartOrder="0" WebPartZoneID="WebPartZone_Top" ID="g_357da23e_61eb_473c_8eac_5609fc574329">
<![CDATA[<WebPart xmlns:xsi="http://www.w3.org/2001/XMLSchema-instance" xmlns:xsd="http://www.w3.org/2001/XMLSchema" xmlns="http://schemas.microsoft.com/WebPart/v2">
<Title>Document Set Properties</Title>
<FrameType>Default</FrameType>
<Description>Displays the properties of the Document Set.</Description>
<IsIncluded>true</IsIncluded>
<ZoneID>WebPartZone_Top</ZoneID>
<PartOrder>0</PartOrder>
<FrameState>Normal</FrameState>
<AllowRemove>true</AllowRemove>
<AllowZoneChange>true</AllowZoneChange>
<AllowMinimize>true</AllowMinimize>
<AllowConnect>true</AllowConnect>
<AllowEdit>true</AllowEdit>
<AllowHide>true</AllowHide>
<IsVisible>true</IsVisible>
<HelpMode>Modeless</HelpMode>
<Dir>Default</Dir>
<MissingAssembly>Cannot import this Web Part.</MissingAssembly>
<PartImageLarge>/_layouts/images/msimagel.gif</PartImageLarge>
<Assembly>Microsoft.Office.DocumentManagement, Version=14.0.0.0, Culture=neutral, PublicKeyToken=71e9bce111e9429c</Assembly>
<TypeName>Microsoft.Office.Server.WebControls.DocumentSetPropertiesWebPart</TypeName>
</WebPart>]]>
</AllUsersWebPart>
</File>
<File Path="WorkOrderCts\_cts\Work Order\Invoice Template.xlsx" Url="_cts/Work Order/Invoice Template.xlsx" />
<File Path="WorkOrderCts\_cts\Work Order\Contract Template.docx" Url="_cts/Work Order/Contract Template.docx" />
</Module>
</Elements>
The three web parts included in the docsethomepage.aspx file element display the details of the documents set when a user views the page. If you want to customize this page, you could add web parts here or customize docsethomepage.aspx itself. In this section make sure the Url element of each File element contains the path specified in the Folder element of the Document Set content type (_cts/Work Order in this case). With all this put together, your Visual Studio project will look something like this.
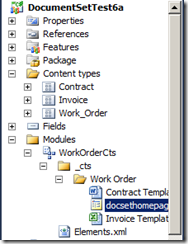
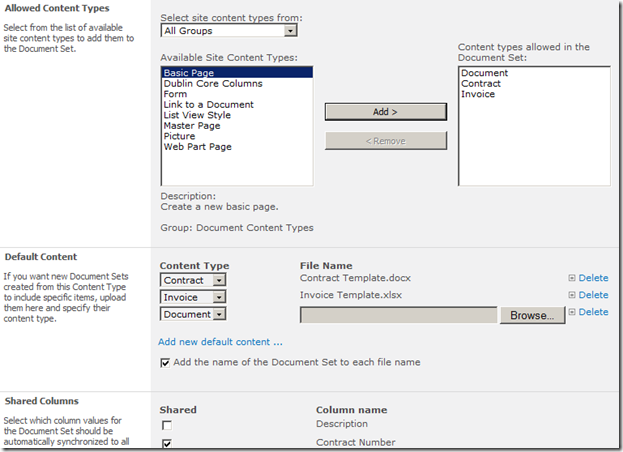
At this point, you can deploy this solution. Make sure the destination site collection has the Document Sets feature activated otherwise things won’t work right. If all goes well, you will have a working Document Set with all of the settings you specified. You can go to the Content Types page, edit your content type and look at the Document Set Settings link to verify that it was create successfully.
If everything looks good with your content type, add it to a document library and try creating a new Document Set. If it works right, you will have a new instance of your Document Set and you will see a page like the one below.
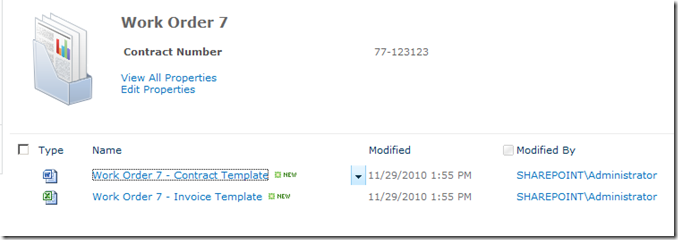
As you can see, it successfully created the default documents and it is displaying my Contract Number field.
Ok, this process may seem a bit involved at this point but it’s really not bad. You can always create this stuff in the UI and then export as site template. Once you export a site template, you can import the pieces you want into a new project. I’ll write up a post on this topic in the future as it is a great way to learn how SharePoint 2010 works behind the scenes.
The new wiki page editor makes editing content on SharePoint pages a ton easier. This lets site administrators and others easily edit text on the page as well as drop in web parts, pictures, and videos wherever they want on the page. I find that the editor works pretty well. However, depending on what is on the page, sometimes I find that I struggle with moving things around and removing white space. A lot of white space tends to get inserted as you add more things to the page. I like to keep things close together so I find myself looking to clean things up a lot. It is just hard to get the WYSIWYG editor to remove some of this sometimes.
As a developer the answer might be obvious to you, but as an end user, you may not know where to go. That is why I thought I’d write up this quick post. Consider the following page in edit mode.
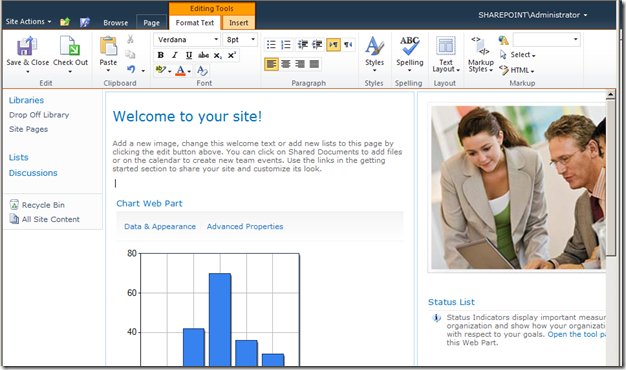
The trick here is that we want to edit the raw HTML of the page. Don’t be scared, it’s easy to do and if you are careful, you won’t break anything. If you do break something, you can always go back to your last version. In the bottom right of the ribbon, there is an HTML button, click on it and then click Edit HTML.

You will then see a popup with the HTML markup for that section of the page.
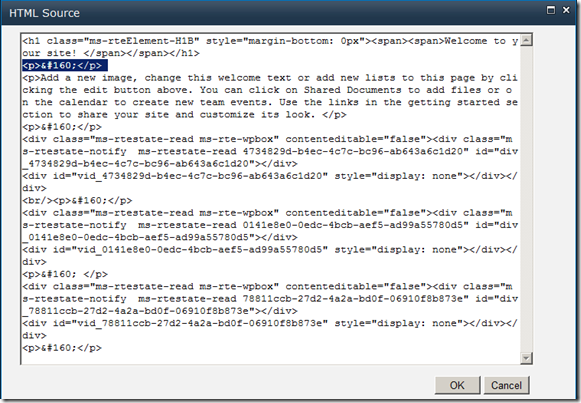
There is a lot to take in here. However, since we’re just looking to remove white space, we’re just looking for one particular line. In this case, we want to remove the following:
<p> </p>
In my example, you might notice that I have that listed several times. I will remove each one I don’t want. It may take some trial and error because it might not be obvious what some of the things are. For example, the div tags in the window above are actually references to web parts. Remove those lines I mentioned above and you will have a lot less white space on the page. When you are done, click OK and you will see how you changed the page. Click Save & Close, if you are happy with your changes. If you do mess something up, just go to the ribbon, click the arrow underneath Save and Close and click Stop Editing. The prompt will ask you if you want to save or not. Just click No and you can try again.
I find myself doing this a lot on demos when I am customizing the page a lot through the browser. I thought it would be a good tip for anyone that wants a little more flexibility with how things are shown on the page.
At Tulsa TechFest, I gave a talk about the various new ECM features available out of the box in SharePoint 2010. One feature of particular interest to the crowd was average ratings. I had lots of questions on it so I thought it was worth a blog post. Instead of describing it first, let’s start with a picture.
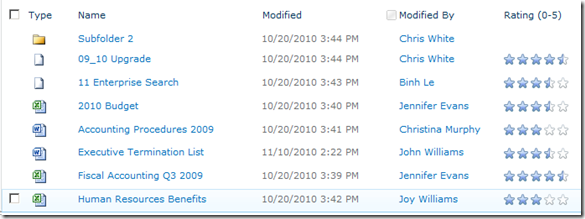
As you can see in the above picture, ratings are a new field available which gives users the ability to rate each document using stars just like they might do in iTunes or any other application. Behind the scenes, it takes the ratings of each user and a timer job comes along periodically and calculates the average rating. This allows users to quickly determine which documents are the most popular when viewing a document library. You can also sort on this field as well. It’s easy to add to both your document libraries and content types.
In reality, Ratings are nothing more than a site column, but SharePoint 2010 makes it really easy to add them to an existing document library. Just click on Library Settings in the ribbon and then Ratings settings.

One you do that, two new site columns are added to your document library, Rating (0-5) and Number of Ratings. The Rating (0-5) site column, named AverageRating internally, is the column users interact with. Users can’t edit the Number of Ratings column, named RatingCount internally. The timer job just uses it to help calculate the average.
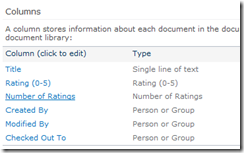
At this point, your users can start rating documents. It’s that simple. When you view the properties on a document, you will see the average rating and the number of ratings as well.
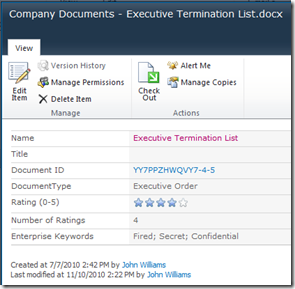
In reality, you can actually just add the above two site columns to any list or content type and have ratings work. I have actually started including these in my base content type on most ECM deployments. This is a content type that I use in lieu of the Document content type which has additional site columns. All other content types I create will inherit from this one. It adds great functionality to every content type that inherits from it. If some people don’t like the ratings on their documents, they can always just remove it from the view on his or her document library.
To add the columns to a content type, just click the Add from existing site columns link on your content type page. You will find the two columns listed in the Ratings Group. You will want to add both of them to your content type.
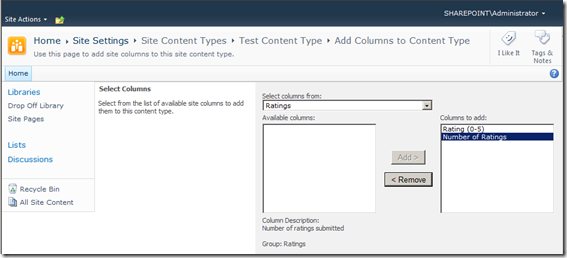
When you add one of these columns, you will get a warning stating that some earlier versions of Office cannot use these fields. If you are using Office 2007 or earlier, you may want to test this out some to see if it will be an issue in your organization.
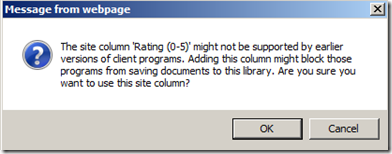
Once you click OK, your content type is ready for use. Now, I would be a bad blogger if I didn’t show you how to add these fields using CAML. If you want to add these two fields to a content type, just add the following elements to the FieldRefs element.
<FieldRef ID="{5a14d1ab-1513-48c7-97b3-657a5ba6c742}" Name="AverageRating" />
<FieldRef ID="{b1996002-9167-45e5-a4df-b2c41c6723c7}" Name="RatingCount" />
Since these fields are included out-of-the-box, I believe those GUIDs should always be the same. If I’m wrong, someone let me know. You can also add these fields to document libraries as well. Just add the following Field elements to the Fields element in your schema.xml.
<Field ID="{5a14d1ab-1513-48c7-97b3-657a5ba6c742}" Name="AverageRating" StaticName="AverageRating" DisplayName="Rating (0-5)" Description="Average value of all the ratings that have been submitted" Group="Ratings" Type="AverageRating" Decimals="2" Min="0" Max="5" ShowInEditForm="TRUE" ShowInDisplayForm="TRUE" ShowInNewForm="FALSE" SourceID="http://schemas.microsoft.com/sharepoint/v3" RowOrdinal="0" />
<Field ID="{b1996002-9167-45e5-a4df-b2c41c6723c7}" Name="RatingCount" StaticName="RatingCount" DisplayName="Number of Ratings" Description="Number of ratings submitted" Group="Ratings" Type="RatingCount" Min="0" Decimals="0" ShowInEditForm="FALSE" ShowInDisplayForm="TRUE" ShowInNewForm="FALSE" SourceID="http://schemas.microsoft.com/sharepoint/v3" RowOrdinal="0" />
Try out document ratings today. They provide a lot of functionality and are quite easy to implement.
Sometimes it is fun to go off-topic, so I figured I’d talk about my first experiences with XBOX Kinect. I ran out to Best Buy last night wondering if they would have any Kinects and to my pleasant surprise, they had plenty of them available for purchase. I bought one and took it home and set it up right away. I didn’t know exactly what I was going to do with the thing, but all of the videos I had seen of it in the past looked pretty cool, so I had to get one.  It’s pretty simple to attach to the XBOX. Just plug it into the USB port in the back and plug the power supply in. Once I turned it on, the XBOX downloaded a pretty big update automatically. When it was finished, it walked me through some basic calibration of the device’s camera and microphone.
I have to say this is a pretty cool device. One of my goals in getting the device was to make the XBOX 360 so easy to use that anyone in the family could handle it. I definitely think that well help. When you first turn on your XBOX, it still boots up into the XBOX Dashboard. However, the mic is always on listening for your voice commands and you can wave at it. I’ll talk about waving in a second, but simply saying “xbox kinect” will bring you into the Kinect Hub which lets you interact with your XBOX using Kinect. The Kinect Hub is the primary place you will be when using the Kinect outside of a game. You can interact with it using your hand or by giving it voice commands. Just say “xbox” and it will show you what you can say to it. Just about any text on the screen can be activated by voice command. I’ll talk about all of the content available in the hub in a bit.
Waving at the Kinect is the most common gesture you use to get it’s attention. Once you do that, you can simply hold your hand out to move a pointer on the screen. To select an item, just hover over it for a second and a white circle will form around the icon indicating that you are selecting it. It reminds me a lot of the way you used to bring up context menus on old Pocket PC devices. You interact with menus by holding your hand out and waving things right or left to scroll. It might take some getting used to, but it’s a pretty good experience.
One of the first things you will probably do is set up Kinect Id. The Kinect Id is associated with your XBOX Live gamer tag. This is where things get cool. You first start by training it to recognize you. It has you perform a series of gestures using your arms. It also has you twist a little bit and move around the room. Once it is finished, you can test it out. Simply walk in front of the Kinect and wave and it will sign you into XBOX Live. When someone else needs to sign in, they just wave at the Kinect and they get signed in. Effectively it recognizes your face and what you look like to determine which user is using it. My 8 year old went through the routine and it had trouble recognizing him, but I think it is because he squirmed too much during the training. We’ll try it again tonight and see how it works.
There are a few Kinect applications available for download once you get everything set up. Selecting each one will cause a download and an XBOX update. The ESPN application is pretty cool. It ties into ESPN3.com and provides a great user experience. It allows you to scroll through live content as well as highlights. I was pleasantly surprised that there is actually live content on there. At the time, there were a few college football games on, I selected it and I instantly had a game streaming to me. The video quality wasn’t bad either. I’m definitely looking forward to trying this application more.
Last.fm also has an application on there. Surprisingly I have never tried last.fm before last night. Pretty neat I have to say. It allows you to pick stations and create your own right through the XBOX. I was even able to create a new account using the XBOX. When you are streaming music, it also displays relevant pictures on the screen in a slide show. It looks like a great application to use when you want something to listen to.
XBOX live has let you steam movies and TV shows for quite some time. In the Kinect Hub, this is branded as the Zune marketplace. I have to say the interface is really slick. As you scroll through, movies, TV, or music videos, it starts a live full screen preview. Click an icon to buy or grab the icon on the side and slide to the left or right to see the next video. I still think the prices are too high for most content on XBOX live. TV shows are usually two dollars and movies are four dollars. However, they charge extra for HD (usually a dollar or two). This makes most movie rentals six dollars, which I think is too much. I guess you pay for convenience. They also charge two dollars to watch a music video. This surprised me since it seems like most videos are already out there on the Internet for free.
The last application worth mentioning is probably the video chat application. The Kinect has features to track where you are so you can just sit on the couch and have a video conversation with someone across the world. It ties into your live messenger account for contacts. Applications don’t really run in the background on an XBOX so I’m not sure if you are in some other application if someone can send you a video call or not and it will switch over. I wasn’t able to really try the application out because I don’t have any friends… on XBOX live. I’m going to work on that though. 
All of that is pretty cool, but hey guess what, you can use it to play games too! It comes with a game called Kinect Adventures. Effectively it is a series of mini-games which shows off the abilities of the Kinect. I played it for about and hour and I was thoroughly exhausted. The game has you kick, punch, strafe, and jump up and down. One mini-game that was particularly fun was white water rafting. You controlled the raft by leaning and strafing. You could also jump in the air to make the raft come out of the water. Another mini-game had you jump and duck to avoid things. I didn’t do so well at that. Maybe I am just getting too old. One thing is for sure, you won’t complain that your kids aren’t getting exercise by sitting around and playing video games with this thing.
All in all, it’s a pretty cool device and I recommend getting one. I was a little disappointed that there are still things in the XBOX dashboard that aren’t Kinect enabled (i.e.: Netflix), but my guess is that more things will use the Kinect over time. I’m looking forward to seeing what else I can do with it tonight.