March 2010 - Posts
It’s spring break and I wasn’t going to make any blog posts this week, but I just ran across this post ( http://www.markvanaalst.com/custom-field/using-jquery-in-custom-fields/ ) from Mark van Aalst concerning using jQuery in Sitecore’s content editor and I just had to comment on it...
I have tried to do this a few times in the past with little to no success. The problem is that, as Mark’s post points out - you need to call $.noConflict() first thing before any other script libraries get loaded. The key that he found in Alexey Rusakov’s FiedTypes module source code (available at http://trac.sitecore.net/FieldTypes/ by the way) was exactly how to do that... You can insert a custom processor into the renderContentEditor pipeline to output the jQuery script first thing. And the truly brilliant part - Alexey is ensuring it is the very first processor in the pipeline by using the new auto-include config file feature in Sitecore 6! (if you haven’t seen that feature before either, check out http://sdn.sitecore.net/faq/administration/how%20to%20auto-include%20configuration%20files.aspx on SDN and be amazed)
Mark’s post didn’t 100% put the pieces together for me, so I’ll spell it out here:
Step 1) Create a pipeline processor class to add jQuery to the page’s <head>. Mark’s post has a great example, so I won’t repeat it here.
Step 2) Create a new .config file in /App_Config/Include. The contents just need to look something like this:
<configuration xmlns:x=“http://www.sitecore.net/xmlconfig/“>
<sitecore>
<pipelines>
<renderContentEditor>
<processor x:before=“*[1]” type=“Your.Type,Your.Assembly” />
</renderContentEditor>
</pipelines>
</sitecore>
</configuration>
The magic bit is the before=“*[1]”. This is explained in the SDN link above, but in case you can’t get to that - you can specify any XPath query (relative to the attribute’s node’s parent). *[1] represents the first child, so in this instance we are asking Sitecore to insert our new processor before the existing first child of the <renderContentEditor> element. This ensures it runs first before any other processor has a chance to inject a script into the content editor page.
In the past when trying to get fancy with a custom field type, I’ve had to fall back on using prototype and give up fancy stuff like scriptaculous or jquery while working in the content editor. No more! With this technique, you can always apply jQuery’s $.noConflict() early on and not worry about some other library calling the wrong $() implementation and causing weird errors. Thank you, Mark! And thank you Alexey for sharing your source!
For the last few weeks, I have been working on a project to customize Able Commerce 7.0.4. When I started on this project, I had never seen Able before and certainly had no idea about the right way to go about doing some of these customizations. Over the course of the project, I’ve figured out a few “best practices” and I figured I’d share them with my blog readers. If you’re reading this and have worked with Able before, feel free to share any other thoughts you may have or correct me if there’s an even better way. :)
The first step in customization is to create a new site theme to contain your work. Note - this is important even if you don’t plan to customize the colors, graphics, and layout of the site. To create a new theme, log in as an admin and navigate to the “Themes File Manager” page on the “Website” menu.

(click for larger image)
In the lower-left corner of this screen is a box to create a new theme by copying an existing one. For this discussion, I have copied the YellowJacket theme and created a new one called “MyTheme”.
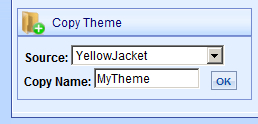
This theme will act as a sort of “container” for your customizations and allow you or your end users to easily activate and deactivate them through the Able UI.
Next, you’ll need to copy a clean Scriptlets folder into your theme (I don’t know why copying an existing theme doesn’t just do this for you... *shrug*). In a standard Able Commerce 7.0.4 install, the Scriptlets folder is located in the App_Data folder under the root of the site. Copy it into the root of your theme’s folder (in my case, I copied /App_Data/Scriptlets to /App_Themes/MyTheme/Scriptlets). If you look inside this folder, you’ll see a Default folder (containing all of the default scriptlets that come with Able) and a Custom folder (containing a structure of empty folders). If we copy a scriptlet inside of the Custom folder, Able will automatically use it in place of the default one. In fact, this is done automatically for you when you customize a scriptlet in Able’s admin interface. But I’ll get to that in a bit.
Now - to actually customize something... Here’s something simple - by default, the Contact Us page just displays some contact information. I’ll add a form to allow the user to submit feedback through the website.
First, I created a new ASP.NET user control - ContactForm.ascx and put it in the /ConLib/Custom folder. This spot seems to exist specifically for custom controls like this. Previously, I have copied controls that come with Able (from the parent ConLib folder) here to make minor changes to them as well.
My ContactForm.ascx is very simple - a few text boxes, a few labels, and a submit button plus code to send an e-mail to an address that is specified via a property. You would probably want to fancy it up a bit with some validation controls, error handling, etc. If you want to see the code I’ve created though, you can download it here: http://www.kevinwilliams.name:8000/dotNetAndStuff/AbleContactForm.zip. The Able Commerce magic comes from this comment at the top of the .ascx:
<%--<conlib>
<summary>
Displays a simple “contact us” or feedback form on the site that allows the user to type a message
and have it submitted to the site’s owner via e-mail.
</summary>
<param name=“EmailTo” default=“admin@example.com”>
Specifies the e-mail address you want the contents of the form submitted to.
</param>
</conlib>
--%>
This is the help text that will be displayed inside Able Commerce for this control. To see it, log in to the Able admin and choose the “ConLib Reference” option from the “Help” menu. In the “Select Control” drop-down, scroll to the bottom and select Custom\ContactForm and the help for the control will be displayed. Note, this also includes a “Usage” that looks like this:
[[ConLib:Custom\ContactForm EmailTo=“admin@example.com”]]
This is how the new control is placed onto a scriptlet - which happens to be the last step I need to do to make the contact form appear on the site. In the Able admin, choose the “Content and Layout” option from the “Website” menu. In the “Show Scriptlets From Theme” drop-down, choose the theme being customized (in my case, “MyTheme”). Able will present a list of all scriptlets for that theme. Scrolling down a bit, I see the “Contact Us” scriptlet. To the right of each scriptlet there is an “Edit” button (the icon looks like a notebook with a pencil). Clicking this brings up the screen used to customize a scriptlet:
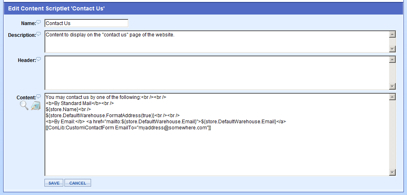
(click to enlarge)
If you look at this screenshot, I have basically just copy/pasted the example usage from the help to the bottom of the existing scriptlet content. Clicking the “Save” button takes me back to the list of scriptlets. But when I scroll down to “Contact Us”, I can now see an X in the “Custom” column - indicating that I have customized this scriptlet.
Anyhow - that’s it! When I log out of the admin interface and go to the Contact Us page on the site, I can see and use my new contact form.
The practices I’ve mentioned here (place your customizations inside a custom theme, use the Able interface to customize scriptlets, add the XML comments to your custom user controls, and placing your user controls in the ConLib\Custom folder) should make it easier to upgrade your site to new releases of Able Commerce, make it easier for you to share your customizations with other Able users, make your work easier to maintain, and make it easy to enable or disable your customizations through the Able admin interface. Have fun!
Mark van Aalst’s EviBlog shared source module takes advantage of the new RSS feed features added to Sitecore in version 6.2, but if you haven’t set that up yet (I hadn’t!) then you may be wondering how to make it work. It’s actually quite simple!
In Content Editor, navigate in the tree to where you want your RSS feed URL to live. Add a content item using the /System/Feeds/RSS Feed data template and name it as you want it to appear in the URL. In my case, I wanted all of my site’s RSS feeds to have URLs such as http://www.kevinwilliams.name:8001/RSS/BlogName.aspx so I created a folder named RSS and created an RSS Feed matching my blog name (in this example, I used “TestBlog”). Heres a screenshot:
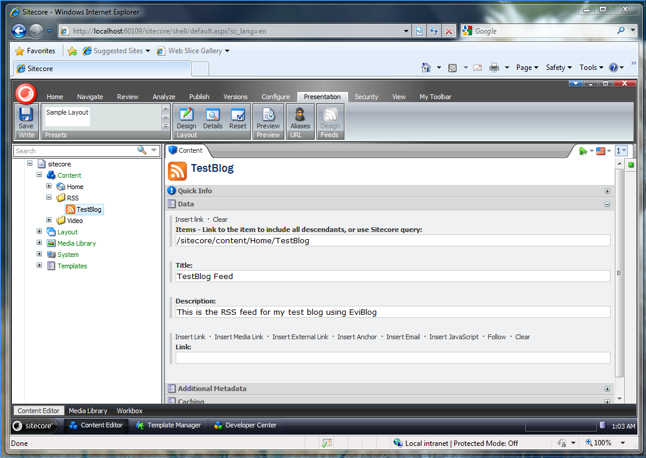
When setting up a Sitecore 6.2 RSS feed, the “Items” field defines what items will be included in the feed. You can either use a Sitecore query ( like query:/sitecore/content/Home/TestBlog/*[@@templatekey=‘blogentry’] ) or simply provide the path to an item whose children should be included in the feed like I did above. Enter a title and description for your blog, and that’s it! EviBlog is already configured with the proper Feed device settings for Sitecore 6.2, so this should be all you have to do. Publish changes and hit your URL to see the RSS feed for your blog! My test one is at http://www.kevinwilliams.name:8001/RSS/TestBlog.aspx.
Something that doesn’t come with EviBlog, but I wanted to add to my site was a “Subscribe via RSS” link on my blog page. To do this, I created a new XSLT Rendering called “RSS Link” and gave it a parameter to control the text that appears like this:
<xsl:param name="Link_Text">Subscribe via RSS</xsl:param>
Then I made the body of the template look like this:
<xsl:template match="*" mode="main">
<sc:link type="application/rss+xml">
<img src="/sitecore/shell/Themes/Standard/Custom/16x16/rss.png" alt="RSS Icon" border="0"/>
<xsl:value-of select="$Link_Text"/>
</sc:link>
</xsl:template>
I want this link to appear in my blog’s sidebar, but the renderings allowed there are restricted. To allow my rendering, I opened the content editor to /sitecore/Layout/Placeholder Settings/phBlogSidebar and added the “RSS Link” rendering to the Allowed Controls.
Lastly, I opened the main blog content item in the page designer, selected the “phBlogSidebar” placeholder, and added my RSS Link rendering. I opened the properties for the rendering and set the Data Source to the RSS feed I created earlier, clicked OK, and clicked Save in the designer. The “Subscribe via RSS” link now appears in my blog’s sidebar!
The only thing left to do would be add support for auto-discovery of my RSS feed (for aggregators like Google Reader). It’s rather simple ( there is an article about it here: http://www.petefreitag.com/item/384.cfm ), but requires inserting some HTML into your page’s <head> tag. One idea for doing this would be to re-implement the above RSS Link rendering as a sublayout instead and then add the HTML to Page.Header.Controls in the ASCX file’s Page_Load() or something. I’ll leave that as an exercise to the reader. :)
EviBlog makes good use of Sitecore 6.2’s new RSS feeds feature and therefore it is very easy to add RSS to your blog. If you’d like more information about the new RSS feed functionality in Sitecore, take a look at the Presentation Component Cookbook on SDN or feel free to contact me if you need any help!
Most of my posts here are directed towards developers writing code or building solutions with tools like Visual Studio, Sitecore, or Silverlight. This particular post talks to more of a System Administrator person... I’ve found that sometimes you have to know how to configure the server yourself (or at least be willing to figure it out), and that was the case for me this time. But while I had to figure it out myself, I’m going to save the next person the trouble by documenting my work here. :)
Windows Media Services 2008 is actually an optional component for Windows Server 2008, but I did my install using the MSU (Microsoft Stand-alone Update) files from here http://www.microsoft.com/downloads/details.aspx?FamilyID=9ccf6312-723b-4577-be58-7caab2e1c5b7&displaylang=en. I downloaded the three 32-bit files (my Win2k8 Server is 32-bit) and installed them in the order Core, then Admin, and then Server. I don’t know if installation order matters - that’s just what I used. :)
Installing these updates just makes the roles available to your server, but it doesn’t make them active. To do that, you will need to open Server Manager, go to Roles, and click Add Roles. Find the Streaming Media Services role and select it for installation. When prompted for the role services, I selected the Windows Media Server and Web-based Administration options. When prompted for the transfer protocols, RTSP was pre-selected and HTTP was grayed out. After some investigation, I learned that HTTP will be grayed out if you already have IIS running on port 80 on this server (which I do) - but it’s possible to enable HTTP on an alternate port after everything else is set up, so I allowed installation of the role to finish.
At this point, I discovered a new Windows Media Services icon in my Administrative Tools control panel. If you open this, an MMC console will open with Windows Media Services at the root of the tree, but there are no servers under it! You can simply right-click on this, select “Add Server”, and type the name or IP address of your server.

After adding the server, you can expand it and you’ll see a node labelled “Publishing Points”. After the initial install, there will be two publishing points defined - one “on demand” and one “broadcast”. These do exactly what they sound like - the on-demand publishing point serves up videos as they are requested and the broadcast publishing point broadcasts videos that users can tune into (like tuning into a television broadcast). For the purposes of my project, an on-demand publishing point will do the trick. I want to serve individual videos on the website as users request them - on demand.
On-demand publishing points serve video from a specific source... This source can be many things including a playlist or even another media server. But for my needs, a directory on the filesystem serves nicely. The default on-demand publishing point created when you install Media Services is a directory - C:\WMPub\WMRoot. You can see this by clicking on the <Default> publishing point and then selecting the Source tab on the right (as pictured below).
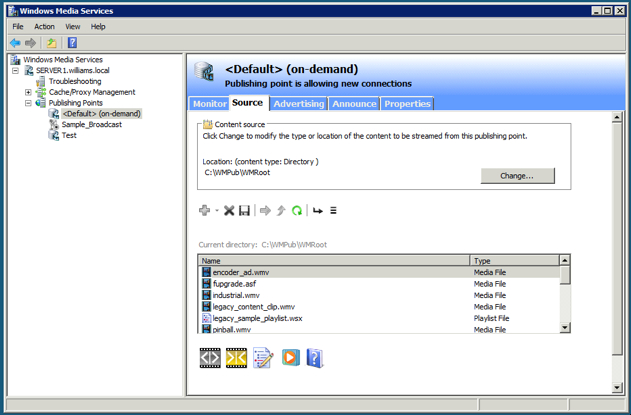
Note that by default, this on-demand publishing point is not enabled. Clicking on the icon in the lower left of the right pane will turn it on. At this point, you can actually try streaming one of the sample files. I opened Windows Media Player on one of my other computers, and hit CTRL+U (for “Open URL”). In the dialog that popped up, I entered the path to one of the sample files listed in the screenshot above (I chose pinball.wmv).
\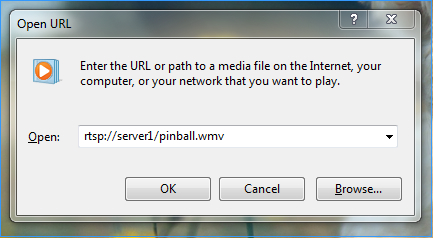
This is an RTSP URL (remember I said earlier RTSP was enabled, but HTTP was not). “server1” is my server and pinball.wmv is the file I chose to stream. Clicking OK on the dialog caused Media Player to immediately start playing the video - IT WORKS! I can now throw any WMV videos I want to make available for streaming into the C:\WMPub\WMRoot and my server will stream them on a URL like that one.
Let me quickly go through the process of setting up HTTP. This is important because Silverlight (well, Minoplayer at the very least) does not seem to support RTSP. If you go back to Server Manager and drill down into Roles, Streaming Media Services, Windows Media Service, and click on your server. Then on the right, click on the Properties tab, select the “Control Protocol” category, and find the HTTP Protocol Plug-in (see screenshot below).
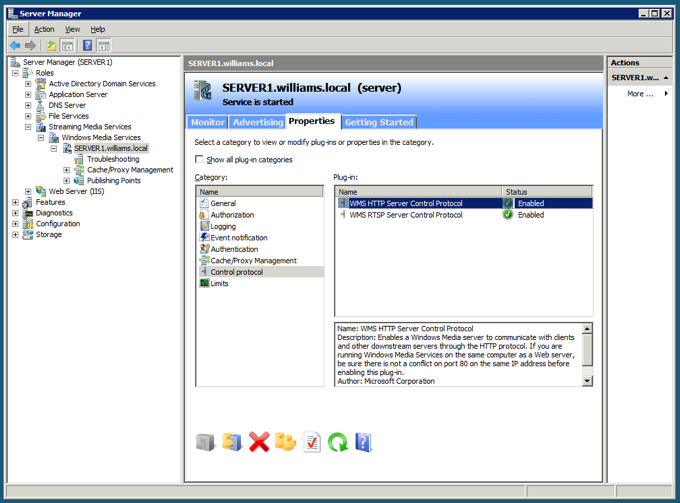
Right-click on the HTTP Server Control Protocol and select Properties to bring up this screen:
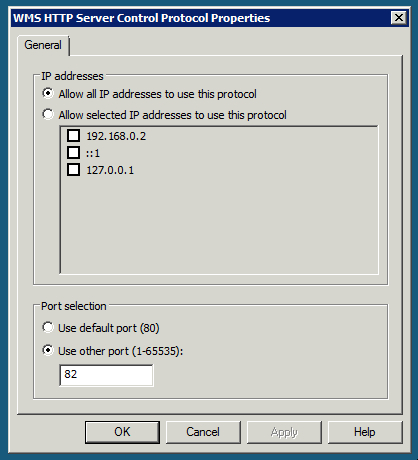
I had to “Use other port” and choose something other than port 80 since IIS is already using it (note - I didn’t use 81 either because in my configuration, IIS is also using that port). Click OK, and then right-click on HTTP again and select “Enabled” to enable it.
Now you can go back to Windows Media Player, hit CTRL+U again, and this time enter an HTTP URL (such as http://server1:82/pinball.wmv - note the port number), and it should play just like the RTSP stream did before.
One last thing I’d like to mention before I wrap up this post. Although my server was streaming to local clients just fine, when I opened the HTTP port on my firewall and forwarded it to my server - I couldn’t get any clients to work! A lot of digging uncovered this hotfix to Windows Media Services: http://support.microsoft.com/kb/960372. After installing that hotfix and rebooting my server, everything worked perfectly!
I can’t claim to be an expert on setting up Windows Media Services, but following the steps above I was able to get a server set up to stream WMV videos to Windows Media Player and to Minoplayer over the Internet. The next steps were wrapping up MinoPlayer in an ASP.NET custom control, building a Sitecore sublayout to wrap that, and building some infrastructure in Sitecore to allow definition of publishing points, describing videos hosted on those publishing points, and possibly even a custom field type in Sitecore to allow uploading of new videos to the directory from the CMS. I’ll follow up this post in the next few days, but if you have questions in the meantime - feel free to contact me!
For quite a while now, I’ve been wanting a simple video streaming solution that I could recommend to clients for whom progressive video downloads won’t cut it and who don’t want to pay to use a CDN like Edgecast or UVault or Limelight. Clients who don’t need to serve a ton of video on their site, and would be able to host it themselves if it were easy and integrated with their WebCMS.
I’ve started working on just such a solution. Right now, I’m using Windows Media Services 2008 (an optional component of Windows 2008 Server - Standard and Enterprise editions) to host and stream the videos, Sitecore to manage uploading and publishing of new videos and related content, and a Silverlight video player I found called Minoplayer. This requires that videos be encoded to WMV format, but I’m already thinking about ways to support Flash video for people who don’t want to use Silverlight (lighttpd’s mod_flv_streaming module looks promising). And of course, HTML5’s <video> element looks interesting too (although codec support problems may make it more difficult to implement).
You can see an early example of the end result of my work here - http://www.kevinwilliams.name:8001/Kologarn.aspx
(be kind to my server - I’m asking a lot from it running Sitecore, SQL Server, Media Services, and a bunch of other stuff on crappy old hardware)
I will post details of my Media Services installation and configuration experience, some information about the Sitecore solution, etc in the next few days.
So I've been investigating .NET mocking frameworks to use for unit testing on one of my current projects... A couple of my needs in particular present a special challenge, and I'm looking for any input from experienced mockers out there on what libraries or tools might be available to address my needs.
Specifically, I am working with a third-party API that doesn't use interfaces. In a lot of cases I am deriving from their classes to add additional functionality, but then calling base-class methods in my new implementation. I need to be able to mock the base class for unit testing. The other big thing is that a lot of their API is static methods, so I can't pass a mock object into my implementation. I need something to intercept the static method call and send it to a mock object instead.
I've been reading about Moq, Rhino Mocks, and Typemock. Typemock seems most likely to handle everything I need, but it's rather expensive and I can't seem to find a trial version or anything that will let me prove it will do what I need. So I'm asking the Internet for suggestions! Anyone?
So I keep hearing about this EviBlog module for Sitecore and how it blows away the old blogs module and how I just have to check it out. So, I finally found some time over the weekend to do a fresh Sitecore 6.2 install, downloaded and installed EviBlog (you can get it here http://trac.sitecore.net/EviBlog/ by the way), and spent a few minutes playing with it.
Here's the site I created (dunno how long this will be up - if you're really interested in EviBlog, feel free to contact me):
http://www.kevinwilliams.name:8001/TestBlog.aspx
As you can see, I haven't done much with it yet, but I can say that Inline page editing works as advertised and the basic structure seems to be there to handle most blog needs. If the Live Writer integration and RSS feeds work as well, I can see myself using this on future projects for sure.
I linked these in the test blog post above, but if you are interested in EviBlog - I definitely think they're worth watching, so I'll link them again here:
http://www.youtube.com/watch?v=qe3Ppqkxhxw
http://www.youtube.com/watch?v=XQUaXWTJyLs